


模型部署3/3-手把手实现利用flask深度学习模型部署

什么是Flask?
Flask是基于Python编写的轻量级Web应用框架 ,用他可以实现 深度学习模型部署为web应用 ,阅读完本文最终能够实现:

首先一个 简单的例子 了解一下 flask的基本框架 :
1. 下载flask
在anaconda prompt输入:
python -m pip --default-timeout=100 install -i https://pypi.tuna.tsinghua.edu.cn/simple flask此方法来自于 《万能pip install大法》 。
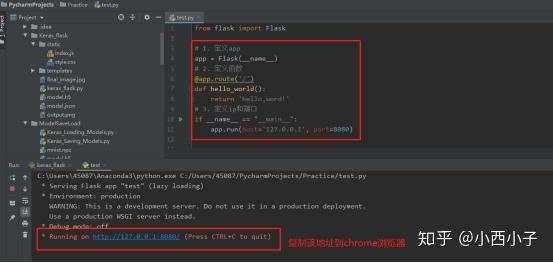
2. 复制以下代码:
from flask import Flask
# 1. 定义app
app = Flask(__name__)
# 2. 定义函数
@app.route('/')
def hello_world():
 return 'hello,word!'
# 3. 定义ip和端口
if __name__ == "__main__":
    app.run(host='127.0.0.1', port=8080)
3. 运行后复制该地址到chrome浏览器

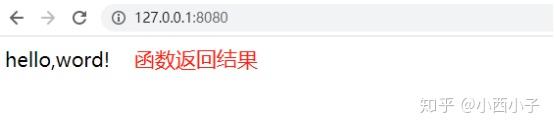
web端展示结果:

了解完flask后,下面将进行 基于flask的MNIST手写数字预测模型部署 。
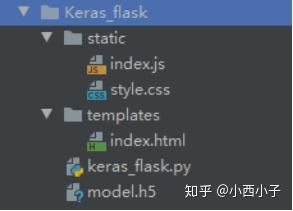
完成后终端会创建以下 文件结构 。这些文件包含:
- 前端web 页面的框架结构(.html)
- 前端 页面的样式(.css)
- 前端 页面按钮的交互 eg.predict和clear按钮 (.js)
- 后台 flask应用程序(.py)
- keras 深度学习模型文件(.h5)
STEP 1:复制model.h5文件到py文件所在文件夹
Model.h5文件 是在 模型部署1/3-构建MNIST手写字深度学习模型 生成的,同时也包含模型建立的过程。
更多的 keras模型保存和加载 的方式查看 模型部署2/3-保存和加载Keras模型的三种方式 。
STEP 2:创建index.js文件
创建Js文件到static文件夹, js文件能够解决前端交互的问题 ,复制以下代码。
(function() {
  var canvas = document.querySelector("#canvas");
  var context = canvas.getContext("2d");
  canvas.width = 280;
  canvas.height = 280;
  var Mouse = { x: 0, y: 0 };
  var lastMouse = { x: 0, y: 0 };
  context.fillStyle = "black";
  context.fillRect(0, 0, canvas.width, canvas.height);
  context.color = "white";
  context.lineWidth = 15;
  context.lineJoin = context.lineCap = "round";
clearCanvas();
canvas.addEventListener( "mousemove",
  function(e) {
    lastMouse.x = Mouse.x;
    lastMouse.y = Mouse.y;
    Mouse.x = e.pageX - this.offsetLeft;
    Mouse.y = e.pageY - this.offsetTop;
}, false);
canvas.addEventListener("mousedown",
  function(e) {
    canvas.addEventListener("mousemove", onDraw, false);
}, false);
canvas.addEventListener("mouseup",
  function() {
    canvas.removeEventListener("mousemove", onDraw, false);
}, false);
/* Canvas Draw */
var onDraw = function() {
  context.lineWidth = context.lineWidth;
  context.lineJoin = "round";
  context.lineCap = "round";
  context.strokeStyle = context.color;
  context.beginPath();
  context.moveTo(lastMouse.x, lastMouse.y);
  context.lineTo(Mouse.x, Mouse.y);
  context.closePath();
  context.stroke();
/* This function clears the box */
function clearCanvas() {
  var clearButton = $("#clearButton");
  clearButton.on("click", function() {
    context.clearRect(0, 0, 280, 280);
    context.fillStyle = "black";
    context.fillRect(0, 0, canvas.width, canvas.height);
/* Slider control */
var slider = document.getElementById("myRange");
var output = document.getElementById("sliderValue");
output.innerHTML = slider.value;
slider.oninput = function() {
  output.innerHTML = this.value;
  context.lineWidth = $(this).val();
$("#lineWidth").change(function() {
  context.lineWidth = $(this).val();
}})();
STEP 3:创建style.css
创建css文件到static文件夹, css文件创建了前端页面的元素 ,复制以下代码。
 body {
  padding-top: 20px;
  padding-bottom: 20px;
.header, .footer {
  padding-right: 15px;
  padding-left: 15px;
.header {
  padding-bottom: 20px;
  border-bottom: 1px solid #e5e5e5;
.header h3 {
  margin-top: 0;
  margin-bottom: 0;
  line-height: 40px;
.footer {
  padding-top: 19px;
  color: #777;
  border-top: 1px solid #e5e5e5;
@media (min-width: 768px) {
  .container {
    max-width: 730px;
.container-narrow > hr {
  margin: 30px 0;
.jumbotron {
  text-align: center;
  border-bottom: 1px solid #e5e5e5;
  padding-top: 20px;
  padding-bottom: 20px;
.bodyDiv{
  text-align: center;
@media screen and (min-width: 768px) {
  .header,
  .footer {
    padding-right: 0;
    padding-left: 0;
.header {
  margin-bottom: 30px;
.jumbotron {
  border-bottom: 0;
@media screen and (max-width: 500px) {
  .slidecontainer{
    display: none;
.slidecontainer{
  float: left;
  width: 30%;
.jumbotronHeading{
  margin-bottom: 7vh;
.canvasDiv{
  display: flow-root;
  text-align: center;
}
STEP 4:创建index.html文件
创建html文件到templates文件夹, html文件创建了web的基本框架 ,复制以下代码。
更多的 前端知识 查看 第一章 产品经理必懂的前端技术 。
 <!DOCTYPE html>
<html lang="en">
<meta charset="utf-8" />
<meta http-equiv="X-UA-Compatible" content="IE=edge" />
<meta name="viewport" content="width=device-width, initial-scale=1" />
<!-- The above 3 meta tags *must* come first in the head; any other head content must come *after* these tags -->
<title>MNIST Handwritten text recognition using keras</title>
<!-- Bootstrap core CSS -->
<link rel="stylesheet" href="https://maxcdn.bootstrapcdn.com/bootstrap/3.3.7/css/bootstrap.min.css" integrity="sha384-BVYiiSIFeK1dGmJRAkycuHAHRg32OmUcww7on3RYdg4Va+PmSTsz/K68vbdEjh4u" crossorigin="anonymous"/>
<link rel="stylesheet" href="{{ url_for('static',filename='style.css') }}"/>
</head>
    <div class="container">
      <div class="header clearfix">
        <h3 class="text-muted">MNIST Handwritten CNN</h3>
      <div class="jumbotron">
        <h3 class="jumbotronHeading">Draw the digit inside this Box   </h3>
        <div class="slidecontainer">
          <p>Drag the slider to change the line width.</p>
          <input type="range" min="10" max="50" value="15" id="myRange" />
          <p>Value: <span id="sliderValue"></span></p>
        <div class="canvasDiv">
          <canvas id="canvas" width="280" height="280" style="padding-bottom: 20px">
          </canvas>
          <br />
          <p style="text-align:center;">
          <a class="btn btn-success myButton" href="#" role="button">Predict</a>
          <a class="btn btn-primary" href="#" id="clearButton" role="button">Clear</a>
      <div class="jumbotron">
        <p id="result">Get your prediction here!!!</p>
      <footer class="footer">
        <p>Keras MNIST</p>
      </footer>
<!-- /container -->
<script src="http://cdnjs.cloudflare.com/ajax/libs/jquery/2.1.3/jquery.min.js"></script>
<script src="{{ url_for('static',filename='index.js') }}"></script><script type="text/javascript">
$(".myButton").click(function() {
  var $SCRIPT_ROOT = {{ request.script_root|tojson|safe }};
  var canvasObj = document.getElementById("canvas");
  var img = canvasObj.toDataURL();
  $.ajax({
    type: "POST",
    url: $SCRIPT_ROOT + "/predict/",
    data: img,
    success: function(data){
      $('#result').text(' Predicted Output: '+data);
</script>
</body>
</html>
STEP 5:创建keras_flask.py文件
该文件包含了 调用flask函数 ,具体的查看代码注释。
from flask import Flask, render_template, request
from scipy.misc import imread, imresize, imsave
import tensorflow as tf
import numpy as np
import re
import base64
from tensorflow.keras.models import load_model
from tensorflow.python.keras.backend import set_session
# 1. 初始化 flask app
app = Flask(__name__)
# 2. 初始化global variables
sess = tf.Session()
graph = tf.get_default_graph()
# 3. 将用户画的图输出成output.png
def convertImage(imgData1):
  imgstr = re.search(r'base64,(.*)', str(imgData1)).group(1)
  with open('output.png', 'wb') as output:
    output.write(base64.b64decode(imgstr))
# 4. 搭建前端框架
@app.route('/')
def index():
  return render_template("index.html")
# 5. 定义预测函数
@app.route('/predict/', methods=['GET', 'POST'])
def predict():
  # 这个函数会在用户点击‘predict’按钮时触发
  # 会将输出的output.png放入模型中进行预测
  # 同时在页面上输出预测结果
  imgData = request.get_data()
  convertImage(imgData)
  # 读取图片
  x = imread('output.png', mode='L')
  # 设置图片的规格
  x = imresize(x, (28, 28))/255
  # 可以保存最终处理好的图片
  imsave('final_image.jpg', x)
  x = x.reshape(1, 28, 28, 1)
  # 调用训练好的模型和并进行预测
  global graph
  global sess
  with graph.as_default():
    set_session(sess)
    model = load_model('model.h5')
    out = model.predict(x)
    response = np.argmax(out, axis=1)