欢迎支持笔者新作:《深入理解Kafka:核心设计与实践原理》和《RabbitMQ实战指南》,同时欢迎关注笔者的微信公众号:朱小厮的博客。

欢迎跳转到本文的原文链接:
https://honeypps.com/mq/rabbitmq-monitor-1/
RabbitMQ作为一个工业级的消息中间件,肯定是缺少不了监控的,RabbitMQ提供了WEB版的页面监控(访问地址:http://xxx.xxx.xxx.xxx:15672/,默认端口号是15672。原文:The web UI is located at: http://server-name:15672/),类似于如下:
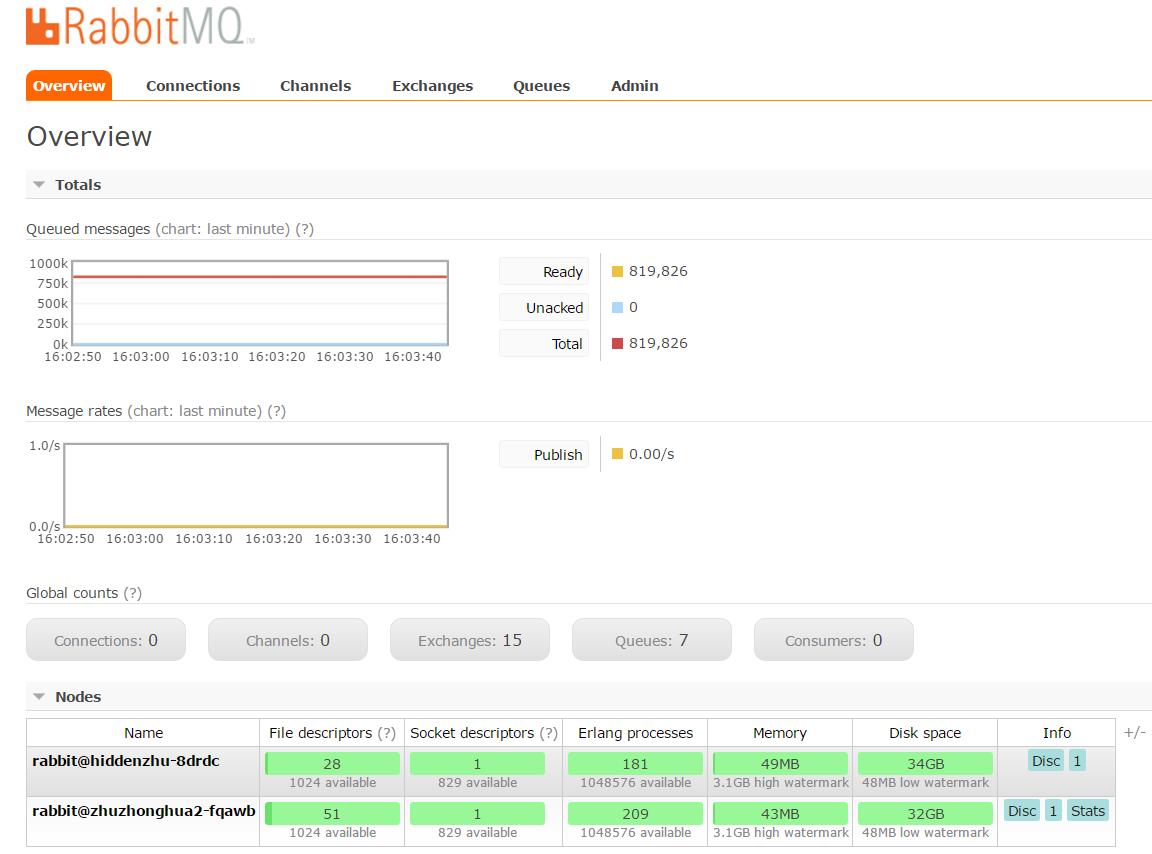
当然,需要有相关功能的前提是开启了:rabbitmqctl rabbitmq_management.
如果小用用的话,这个web管理界面就够了,如果公司有专门的团队,比如中间件团队来专门负责一些基础组件,那么必然会有自身的一套生态环境,那么自然而然的独立的且可以和公司其他系统接入的监控系统必不可少,没有监控的代码那是一抹黑的。
要构建独立的监控系统,可以利用RabbitMQ提供的restful http api接口(原文:The HTTP API and its documentation are both located at: http://server-name:15672/api/ (or view our
latest HTTP API documentation here
).)。当然这个接口的作用远不至于调取一些监控数据,也可以通过api来操作RabbitMQ进行添加删除的操作(GET,PUT,DELETE,POST)。
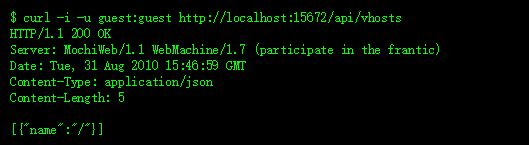
引用RabbitMQ官网的例子,比如列出所有的vhosts:
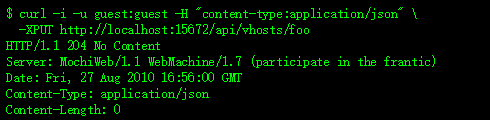
再比如创建一个新的vhost:
采用RabbitMQ提供的restful http api来做监控其实很简单,只需调用(比如HttpClient工具):http://server-ip:15672/api/nodes即可。下面展示下博主这里的某些监控指标:broker节点的内存占用,磁盘剩余空间,Socket句柄,Broker子进程数,文件句柄数。监控示例图分别如下:
"queue_index_journal_write_count": 1,
"queue_index_journal_write_count_details": {
"rate": 0
"queue_index_read_count": 1,
"queue_index_read_count_details": {
"rate": 0
"queue_index_write_count": 1,
"queue_index_write_count_details": {
"rate": 0
"sockets_used": 1,
"sockets_used_details": {
"rate": 0
"partitions": [],
"os_pid": "795",
"fd_total": 1024,
"sockets_total": 829,
"mem_limit": 3301929779,
"mem_alarm": false,
"disk_free_limit": 50000000,
"disk_free_alarm": false,
"proc_total": 1048576,
"rates_mode": "basic",
"uptime": 100629724,
"run_queue": 0,
"processors": 4,
"exchange_types": [
"name": "headers",
"description": "AMQP headers exchange, as per the AMQP specification",
"enabled": true
"name": "topic",
"description": "AMQP topic exchange, as per the AMQP specification",
"enabled": true
"name": "direct",
"description": "AMQP direct exchange, as per the AMQP specification",
"enabled": true
"name": "fanout",
"description": "AMQP fanout exchange, as per the AMQP specification",
"enabled": true
"auth_mechanisms": [
"name": "PLAIN",
"description": "SASL PLAIN authentication mechanism",
"enabled": true
"name": "AMQPLAIN",
"description": "QPid AMQPLAIN mechanism",
"enabled": true
"name": "RABBIT-CR-DEMO",
"description": "RabbitMQ Demo challenge-response authentication mechanism",
"enabled": false
"applications": [
"name": "amqp_client",
"description": "RabbitMQ AMQP Client",
"version": "3.5.7"
"name": "inets",
"description": "INETS CXC 138 49",
"version": "6.3.3"
"name": "kernel",
"description": "ERTS CXC 138 10",
"version": "5.1"
"name": "mnesia",
"description": "MNESIA CXC 138 12",
"version": "4.14.1"
"name": "mochiweb",
"description": "MochiMedia Web Server",
"version": "2.7.0-rmq3.5.7-git680dba8"
"name": "os_mon",
"description": "CPO CXC 138 46",
"version": "2.4.1"
"name": "rabbit",
"description": "RabbitMQ",
"version": "3.5.7"
"name": "rabbitmq_management",
"description": "RabbitMQ Management Console",
"version": "3.5.7"
"name": "rabbitmq_management_agent",
"description": "RabbitMQ Management Agent",
"version": "3.5.7"
"name": "rabbitmq_web_dispatch",
"description": "RabbitMQ Web Dispatcher",
"version": "3.5.7"
"name": "sasl",
"description": "SASL CXC 138 11",
"version": "3.0.1"
"name": "stdlib",
"description": "ERTS CXC 138 10",
"version": "3.1"
"name": "webmachine",
"description": "webmachine",
"version": "1.10.3-rmq3.5.7-gite9359c7"
"name": "xmerl",
"description": "XML parser",
"version": "1.3.12"
"contexts": [
"description": "RabbitMQ Management",
"path": "/",
"port": "15672"
"log_file": "/opt/rabbitmq/sbin/../var/log/rabbitmq/rabbit@hiddenzhu-8drdc.log",
"sasl_log_file": "/opt/rabbitmq/sbin/../var/log/rabbitmq/rabbit@hiddenzhu-8drdc-sasl.log",
"db_dir": "/opt/rabbitmq/sbin/../var/lib/rabbitmq/mnesia/rabbit@hiddenzhu-8drdc",
"config_files": [
"/opt/rabbitmq/sbin/../etc/rabbitmq/rabbitmq.config (not found)"
"net_ticktime": 60,
"enabled_plugins": [
"rabbitmq_management"
"name": "rabbit@hiddenzhu-8drdc",
"type": "disc",
"running": true
"cluster_links": [
"peer_addr": "xx.xx.198.10",
"peer_port": 29226,
"sock_addr": "xx.xx.197.73",
"sock_port": 25672,
"stats": {
"send_bytes": 2714033,
"send_bytes_details": {
"rate": 8.2
"recv_bytes": 49847976,
"recv_bytes_details": {
"rate": 491.6
"name": "rabbit@hiddenzhu-8drdc"
"disk_free": 34482147328,
"disk_free_details": {
"rate": -2457.6
"fd_used": 36,
"fd_used_details": {
"rate": 0.4
"io_read_avg_time": 0,
"io_read_avg_time_details": {
"rate": 0
"io_read_bytes": 479585,
"io_read_bytes_details": {
"rate": 0
"io_read_count": 6,
"io_read_count_details": {
"rate": 0
"io_seek_count": 1,
"io_seek_count_details": {
"rate": 0
"io_sync_avg_time": 0,
"io_sync_avg_time_details": {
"rate": 0
"io_write_avg_time": 0,
"io_write_avg_time_details": {
"rate": 0
"mem_used": 44401848,
"mem_used_details": {
"rate": 7947.2
"mnesia_disk_tx_count": 6,
"mnesia_disk_tx_count_details": {
"rate": 0
"mnesia_ram_tx_count": 44,
"mnesia_ram_tx_count_details": {
"rate": 0
"proc_used": 194,
"proc_used_details": {
"rate": 0
"queue_index_read_count": 1,
"queue_index_read_count_details": {
"rate": 0
"sockets_used": 1,
"sockets_used_details": {
"rate": 0
"partitions": [],
"os_pid": "3806",
"fd_total": 1024,
"sockets_total": 829,
"mem_limit": 3301929779,
"mem_alarm": false,
"disk_free_limit": 50000000,
"disk_free_alarm": false,
"proc_total": 1048576,
"rates_mode": "basic",
"uptime": 100632422,
"run_queue": 0,
"processors": 4,
"exchange_types": [
"name": "headers",
"description": "AMQP headers exchange, as per the AMQP specification",
"enabled": true
"name": "topic",
"description": "AMQP topic exchange, as per the AMQP specification",
"enabled": true
"name": "direct",
"description": "AMQP direct exchange, as per the AMQP specification",
"enabled": true
"name": "fanout",
"description": "AMQP fanout exchange, as per the AMQP specification",
"enabled": true
"auth_mechanisms": [
"name": "PLAIN",
"description": "SASL PLAIN authentication mechanism",
"enabled": true
"name": "AMQPLAIN",
"description": "QPid AMQPLAIN mechanism",
"enabled": true
"name": "RABBIT-CR-DEMO",
"description": "RabbitMQ Demo challenge-response authentication mechanism",
"enabled": false
"applications": [
"name": "amqp_client",
"description": "RabbitMQ AMQP Client",
"version": "3.5.7"
"name": "inets",
"description": "INETS CXC 138 49",
"version": "6.3.3"
"name": "kernel",
"description": "ERTS CXC 138 10",
"version": "5.1"
"name": "mnesia",
"description": "MNESIA CXC 138 12",
"version": "4.14.1"
"name": "mochiweb",
"description": "MochiMedia Web Server",
"version": "2.7.0-rmq3.5.7-git680dba8"
"name": "os_mon",
"description": "CPO CXC 138 46",
"version": "2.4.1"
"name": "rabbit",
"description": "RabbitMQ",
"version": "3.5.7"
"name": "rabbitmq_management",
"description": "RabbitMQ Management Console",
"version": "3.5.7"
"name": "rabbitmq_management_agent",
"description": "RabbitMQ Management Agent",
"version": "3.5.7"
"name": "rabbitmq_web_dispatch",
"description": "RabbitMQ Web Dispatcher",
"version": "3.5.7"
"name": "sasl",
"description": "SASL CXC 138 11",
"version": "3.0.1"
"name": "stdlib",
"description": "ERTS CXC 138 10",
"version": "3.1"
"name": "webmachine",
"description": "webmachine",
"version": "1.10.3-rmq3.5.7-gite9359c7"
"name": "xmerl",
"description": "XML parser",
"version": "1.3.12"
"contexts": [
"description": "RabbitMQ Management",
"path": "/",
"port": "15672"
"log_file": "/opt/rabbitmq/sbin/../var/log/rabbitmq/rabbit@zhuzhonghua2-fqawb.log",
"sasl_log_file": "/opt/rabbitmq/sbin/../var/log/rabbitmq/rabbit@zhuzhonghua2-fqawb-sasl.log",
"db_dir": "/opt/rabbitmq/sbin/../var/lib/rabbitmq/mnesia/rabbit@zhuzhonghua2-fqawb",
"config_files": [
"/opt/rabbitmq/sbin/../etc/rabbitmq/rabbitmq.config (not found)"
"net_ticktime": 60,
"enabled_plugins": [
"rabbitmq_management"
"name": "rabbit@zhuzhonghua2-fqawb",
"type": "disc",
"running": true
这段json中的mem_used, disk_free, socket_used, proc_used, fd_used分别对应上面监控图中的内存占用,磁盘剩余空间,Socket句柄数,Broker子进程数以及文件句柄数。
下面是一个demo代码,主要使用HttpClient以及jackson来调用相关参数。
相关maven如下:
<dependency>
    <groupId>org.apache.httpcomponents</groupId>
    <artifactId>httpclient</artifactId>
    <version>4.3.6</version>
</dependency>
<dependency>
 <groupId>com.fasterxml.jackson.core</groupId>
 <artifactId>jackson-databind</artifactId>
 <version>2.7.4</version>
</dependency>
<dependency>
 <groupId>com.fasterxml.jackson.core</groupId>
 <artifactId>jackson-annotations</artifactId>
 <version>2.7.4</version>
</dependency>
<dependency>
 <groupId>com.fasterxml.jackson.core</groupId>
 <artifactId>jackson-core</artifactId>
 <version>2.7.4</version>
</dependency>
相关代码(有点长):
package com.vms.test.zzh.rabbitmq.monitor;
import com.fasterxml.jackson.databind.DeserializationFeature;
import com.fasterxml.jackson.databind.JsonNode;
import com.fasterxml.jackson.databind.ObjectMapper;
import com.fasterxml.jackson.databind.SerializationFeature;
import org.apache.http.HttpEntity;
import org.apache.http.auth.UsernamePasswordCredentials;
import org.apache.http.client.methods.CloseableHttpResponse;
import org.apache.http.client.methods.HttpGet;
import org.apache.http.impl.auth.BasicScheme;
import org.apache.http.impl.client.CloseableHttpClient;
import org.apache.http.impl.client.HttpClients;
import org.apache.http.util.EntityUtils;
import java.io.IOException;
import java.util.HashMap;
import java.util.Iterator;
import java.util.Map;
 * Created by hidden on 2017/3/9.
public class MonitorDemo {
    public static void main(String[] args) {
        try {
            Map<String, ClusterStatus> map = fetchNodesStatusData("http://xx.xx.197.73:15672/api/nodes", "root", "root");
            for (Map.Entry entry : map.entrySet()) {
                System.out.println(entry.getKey() + " : " + entry.getValue());
        } catch (IOException e) {
            e.printStackTrace();
    public static Map<String,ClusterStatus> fetchNodesStatusData(String url, String username, String password) throws IOException {
        Map<String, ClusterStatus> clusterStatusMap = new HashMap<String, ClusterStatus>();
        String nodeData = getData(url, username, password);
        JsonNode jsonNode = null;
        try {
            jsonNode = JsonUtil.toJsonNode(nodeData);
        } catch (IOException e) {
            e.printStackTrace();
        Iterator<JsonNode> iterator = jsonNode.iterator();
        while (iterator.hasNext()) {
            JsonNode next = iterator.next();
            ClusterStatus status = new ClusterStatus();
            status.setDiskFree(next.get("disk_free").asLong());
            status.setFdUsed(next.get("fd_used").asLong());
            status.setMemoryUsed(next.get("mem_used").asLong());
            status.setProcUsed(next.get("proc_used").asLong());
            status.setSocketUsed(next.get("sockets_used").asLong());
            clusterStatusMap.put(next.get("name").asText(), status);
        return clusterStatusMap;
    public static String getData(String url, String username, String password) throws IOException {
        CloseableHttpClient httpClient = HttpClients.createDefault();
        UsernamePasswordCredentials creds = new UsernamePasswordCredentials(username, password);
        HttpGet httpGet = new HttpGet(url);
        httpGet.addHeader(BasicScheme.authenticate(creds, "UTF-8", false));
        httpGet.setHeader("Content-Type", "application/json");
        CloseableHttpResponse response = httpClient.execute(httpGet);
        try {
            if (response.getStatusLine().getStatusCode() != 200) {
                System.out.println("call http api to get rabbitmq data return code: " + response.getStatusLine().getStatusCode() + ", url: " + url);
            HttpEntity entity = response.getEntity();
            if (entity != null) {
                return EntityUtils.toString(entity);
        } finally {
            response.close();
        return "";
    public static class JsonUtil {
        private static ObjectMapper objectMapper = new ObjectMapper();
        static {
            objectMapper.disable(DeserializationFeature.FAIL_ON_UNKNOWN_PROPERTIES);
            objectMapper.disable(SerializationFeature.FAIL_ON_EMPTY_BEANS);
        public static JsonNode toJsonNode(String jsonString) throws IOException {
            return objectMapper.readTree(jsonString);
    public static class ClusterStatus {
        private long diskFree;
        private long diskLimit;
        private long fdUsed;
        private long fdTotal;
        private long socketUsed;
        private long socketTotal;
        private long memoryUsed;
        private long memoryLimit;
        private long procUsed;
        private long procTotal;
// 此处省略了Getter和Setter方法
        @Override
        public String toString() {
            return "ClusterStatus{" +
                    "diskFree=" + diskFree +
                    ", diskLimit=" + diskLimit +
                    ", fdUsed=" + fdUsed +
                    ", fdTotal=" + fdTotal +
                    ", socketUsed=" + socketUsed +
                    ", socketTotal=" + socketTotal +
                    ", memoryUsed=" + memoryUsed +
                    ", memoryLimit=" + memoryLimit +
                    ", procUsed=" + procUsed +
                    ", procTotal=" + procTotal +
代码输出:
rabbit@zhuzhonghua2-fqawb : ClusterStatus{diskFree=34480971776, diskLimit=0, fdUsed=38, fdTotal=0, socketUsed=1, socketTotal=0, memoryUsed=44508400, memoryLimit=0, procUsed=196, procTotal=0}
rabbit@hiddenzhu-8drdc : ClusterStatus{diskFree=36540743680, diskLimit=0, fdUsed=28, fdTotal=0, socketUsed=1, socketTotal=0, memoryUsed=53331640, memoryLimit=0, procUsed=181, procTotal=0}
更多RabbitMQ restful http api可以关注参考资料2。
欲了解更多消息中间件的内容,可以关注:消息中间件收录集
1.http://www.rabbitmq.com/management.html
 2.http://hg.rabbitmq.com/rabbitmq-management/raw-file/rabbitmq_v3_0_1/priv/www/api/index.html
欢迎跳转到本文的原文链接:https://honeypps.com/mq/rabbitmq-monitor-1/
欢迎支持笔者新作:《深入理解Kafka:核心设计与实践原理》和《RabbitMQ实战指南》,同时欢迎关注笔者的微信公众号:朱小厮的博客。

				1.是否有成熟的方法,了解rabbitmq的性能瓶颈会有哪些?,如果做到对这些性能瓶颈的监控?
2.怎样对rabbitmq server进行并发测试,使得服务器能达到性能瓶颈?
3.是否有其他现成的工具或者方法来判断是否rabbitmq到达性能瓶颈?
4.当rabbitmq到达性能瓶颈后,程序的表现是什么样的?
新人求大神指教呀!感激不尽!
				本系列是「RabbitMQ实战:高效部署分布式消息队列」书籍的总结笔记。
上一篇总结了可能出现的异常场景,并对RabbitMQ提供的可用性保证进行了分析,在出现服务器宕机后,仍然可以正常服务。另外,需要尽快恢复异常的服务器,重新加入集群,推送未消费的消息,通过监控可第一时间接收到错误并进行处理。
另外,我们想主动了解消息堆积和消费的情况,以及服务器节点的压力,RabbitMQ提供了几种方式便捷...
首先安装Erlang Windows Binary Files,然后安装rabbitmq-server-3.0.0.exe,安装过程可参考http://www.rabbitmq.com/install-windows.html
RabbitMQ提供了一个web的监控页面系统,这个系统是以Plugin的方式进行调用的。
运行下面命令来启用管理插件:
 rabbi
				本文转自:https://blog.csdn.net/xingxing513234072/article/details/51014850
一、文档资料
       1、官方网站:http://www.rabbitmq.com/
       2、安装教程:http://www.rabbitmq.com/install-windows.html
二、安装指南
        欢迎支持笔者新作:《深入理解Kafka:核心设计与实践原理》和《RabbitMQ实战指南》,同时欢迎关注笔者的微信公众号:朱小厮的博客。

 个人博客地址:http://honeypps.com/

 联系方式:angeliazjz (微信,记得备注来意,可以联系加入技术群)